

AmigOS
Responsibilities
- Led two teams of CS students to create a C++ operating system and load a networked chatroom application.
- Wireframed UI/UX Flow in Whimsical
- Wrote keyboard input support and display.
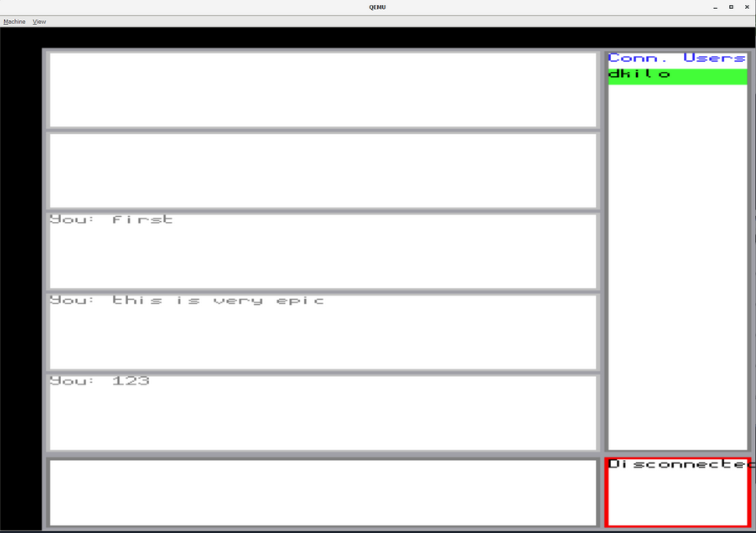
Running on QEMU for x86
GitLab Repository (Private)
Roles:
- Team lead / liasion
- Worked between teams to ensure deadelines met. Modified plans accordingly
- Keyboard-Integration team lead
- Lead team to implement keyboard functionality direct from PS/2 serial input read by the operating system and printed on the UI
- Attended semi-weekly meetings on project goals and updates
- Chatroom-UI team lead
- Lead team to implement all frontend for final deliverable using libraries from other teams
- UI/UX designer
- Wireframed UI/UX flow and integration needs using Whimsical
- UI Developer
- Implemented entire GUI solo using library from graphics team
Whimsical Board, Overall Project Design
Both of these boards were primarily authored by Daniel.
Whimsical Board, Client GUI (annotated)
Custom Build instructions:
- download and install qemu
- MAC USERS can install using homebrew with your preferred terminal application and
brew install qemu
- MAC USERS can install using homebrew with your preferred terminal application and
- install
makeif you don't have it already and compile your program usingmake <testName>(via SSH, WSL, or locally) - download
kernel/build/kernel.imganddisk/<testName>.imgto your local machine - change
file=kernel.imgandfile=sysCalls.imgin the following script to match the paths of your kernel and test name image files, respectively:
qemu-system-i386 -no-reboot -accel tcg,thread=multi -cpu max -smp 4 -m 128m -serial stdio -drive file=kernel.img,index=0,media=disk,format=raw -device isa-debug-exit,iobase=0xf4,iosize=0x04 -drive file=sysCalls.img,index=1,id=usbstick,format=raw -usb -device qemu-xhci,id=xhci -device ich9-intel-hda -device hda-micro
- (WINDOWS ONLY STEP): Add
C:\Program Files\qemuto your PATH (search for "environment variables" in control panel) - open up powershell/terminal
- cd to the same location as where your
kernel.imgand<testName.img>are being stored - run the script